Human-Interfacing Devices: The Descriptor Heist
Today, we’ll build our own input devices. And they will be easy to create and write firmware for, they will work perfectly, and they will be cross-platform. We can do that with help of the Human Interface Device (HID) standard, and by way of introduction, so that you never get confused by what a “descriptor” means, and we’ll build our own HID device — a Human Interface Device device. The way we build them won’t require reading specifications – instead, I’ll teach your how to steal HID descriptors from existing devices, tweak them for our purposes, and use them in our devices to harness the power of HID.
For decades now, it’s been possible to build a HID mouse or keyboard by using a library or two, and it’s been a godsend for hackers all around the world. However, these libraries are typically confined to a certain template and inflexible, and we hackers often go outside of what’s expected. HID allows for much more than a simple keyboard or a mouse. That’s why today we’re building a touchscreen – something not yet covered online or by libraries.
HID lets you build devices that are friendly. They don’t need drivers, they are plug and play, and they do what you expect them to do. At its core, the HID standard is as simple as is ubiquitous. You can tunnel HID over USB, Bluetooth, I2C, and modern-day operating systems support all three of these. Today, let’s go through the basics of HID, and then build a USB touchscreen out of a SPI-connected resistive touchscreen, with help of the usual RP2040+MicroPython combo. I will also give you a toolkit for how to debug a Human Interface Device device as thoroughly as possible – specifically on Linux, showing all the HID debug and introspection capabilities that Linux gives you. But it’ll work on Windows too through the beauty of standardization.
Checking The Map
There’s quite a few guides on this topic by now, but of course, I’ll go in more detail, be more succinct, and give you tools that other guides don’t have. That said, you can always benefit from multiple different guides to cross-reference on your journey, so here’s an Adafruit guide, and here’s a few other ones. In particular, they go further into HID descriptor structure and explain it in all the detail you could use when figuring out descriptors. Instead, I will give you a high-level overview of HID, and demonstrate you that you don’t need to fully understand HID descriptors to create HID devices – you can hack on them all the same.
A report descriptor is a machine-readable guide on how to parse a HID packet (“report”) from your device. The descriptor tells your OS which bits and bytes inside a HID packet correspond to what kinds of data. When a HID device is connected to your OS, the OS gets the descriptor, reads it, learns what it can expect from your device, and whenever an incoming packet of data arrives, the OS parses your device’s packet given the info in the descriptor.
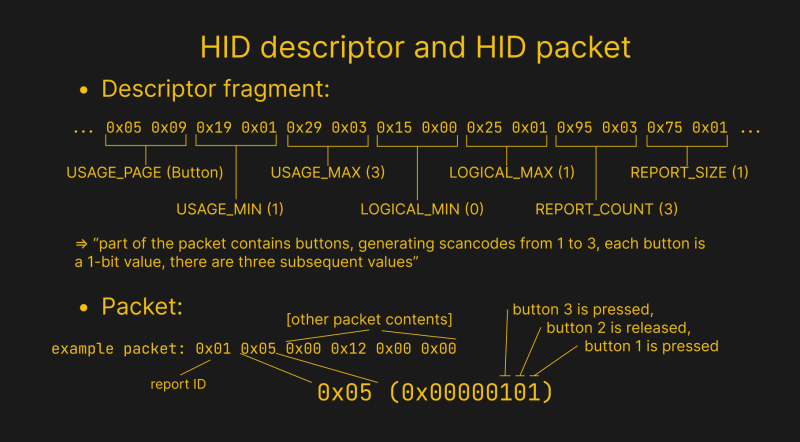
Of course, your device could be sending different kinds of packets, for different sorts of data. For instance, a mouse-plus-keyboard wireless receiver would send at least two different kinds of HID packets, and a touchscreen would send different packets based on whether you’re using a finger, or the special stylus. That’s why a report descriptor can have different sections for different types of packets, and the packets are then distinguished by the report ID. This ID has to be the first byte of the report – if you don’t get the ID first and foremost, you don’t know which section of the descriptor to use to parse the entire packet that just arrived.
It’s easy to build a HID mouse. It’s easy to build a HID keyboard. There are libraries for both of these, and if you want to build a keyboard, the Adafruit tutorial will show you how. Today, I need to build a different device for my arsenal – a small portable touchscreen display, something that’s not exactly available off the shelf. Naturally, I also want it to be plug and play, and in the future, I want to have it be accessible over I2C for all my embedded needs, too.
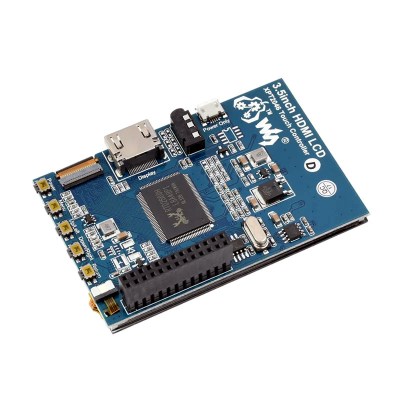
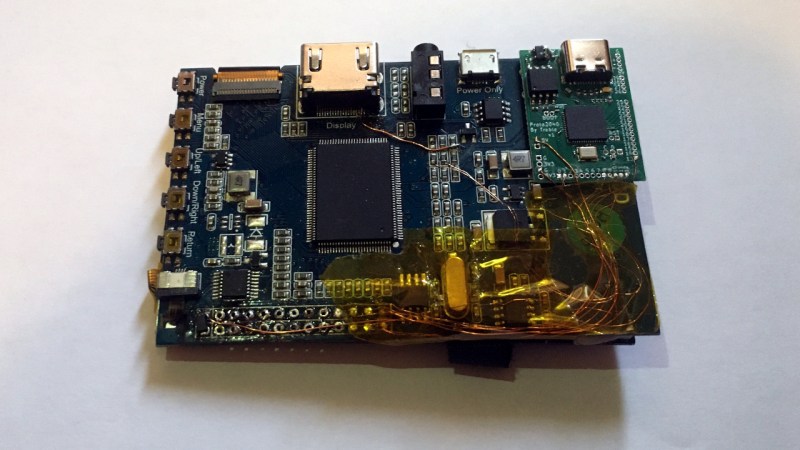
As a test polygon, here’s a touch-enabled HDMI screen with an SPI-connected XPT2046 resistive touchscreen controller IC, a clone of the ADS7846, with SPI pins exposed onto a Raspberry Pi-compatible header. The HDMI part of it is alright, save for it pretending to be a 1080p screen while its actual resolution is 480×320. The touchscreen part, however, is a pretty obtuse piece of tech – it only works if you have an SPI interface, you have to load the driver before anything works, and if you unplug it, you might have to reboot your Pi for the touchscreen to work again. Plus, it’s a bother to calibrate. HID support would make it universal, plug&play, and having our own firmware would let us to even put calibration settings into nonvolatile storage, something that all self-respecting touchscreen displays do.
All that our firmware has to do is to store a descriptor, and then send descriptor-matching HID packets to the OS whenever we want to send touch coordinates. As long as the OS is okay with our descriptor and the values in our packets make sense, the OS is going to create touchscreen events from our packets. It’s really this simple.
A Vault Full Of Descriptors
One way to create a touchscreen descriptor is to read the HID specification, figure out all the things you need to say in your descriptor to be a valid touchscreen, carefully put those things together, and then debug it until it works. If this doesn’t really sound fun for you, don’t worry, it doesn’t sound fun for me either.
Here’s a hacker-friendly plan instead. We steal a HID descriptor from a touchscreen, see how the touchscreen events are parsed by an OS, then make our own touchscreen descriptor out of a mouse one, send packets that correspond to this descriptor, and see how our OS reacts. I have a capacitive touchscreen panel that I’ve salvaged from a laptop – it connects over USB, it works on Linux without trouble, and that’s very much enough to extract a descriptor from.
We won’t be using super abstract libraries today, either – let’s build raw packets and see how they work. MicroPython still doesn’t have HID support, somehow, so here’s a build of MicroPython, where [elpekenin] has added HID device support with only a few extra commits (plus, undoubtedly, hours of blood, sweat and tears). There’s no “send ‘A’ keypress” API to speak of, you must make your packets even for keyboard use – but it’s very simple, and, that’s perfect for our goal! This build was made by [Pablo Martínez (elpekenin)], and I’m eternally grateful to them for sharing it – go follow them on GitHub, they make cool stuff! For the XPT2046 driver, I’ve used a XPT2046 MicroPython library by the ever-prolific [robert-hh], who is also the hacker to turn to if you want your fix of high-quality MicroPython libraries and tools!
I suggest cloning this repository like git clone --branch peke-devel --recursive URL, since the main branch of the repository was rebased onto CircuitPython and the recursive clone required for the main branch, will also pull in an absolute ton of Adafruit and other code that was added into CircuitPython. Cloning only the specific branch we need, that still relies only on MicroPython libraries, will save you a ton of bandwidth, time, and disk space. Once you do that, however, compiling this firmware and loading this onto a friendly RP2040 will give you a good few new HID devices, and a library to import:
import time
import usb_hid

report = bytearray(8)

report[2] = 0x04 # register 'a' keycode
usb_hid.report(usb_hid.KEYBOARD, report) # send event

time.sleep(2)

report[2] = 0x00 # unregister 'a' keycode
usb_hid.report(usb_hid.KEYBOARD, report) # send event
As you can see, a report is 8 bytes (64 bits) long, and different bits in the report respond to different characters you can send. If you’re wondering how is it that 0x04 corresponds to a, that’s a default bit-to-character mapping that can be found here and here and more info here, here’s more tips on how you can mod that mapping. Most of this firmware’s HID descriptors come from TUSB library, tried and true, and, there’s also the MOUSE_ABS descriptor added in the code itself, that you can change if you simply recompile the firmware!
With the MOUSE_ABS descriptor helpfully included and easily editable in particular, you have everything you could need to make your own descriptor quickly, be it a custom keyboard, a touchscreen, or a Braille display. In CircuitPython, you don’t even have to recompile the firmware to change a descriptor, but it’d be harder to use CircuitPython for tinkering here, for reasons we might just pinpoint and alleviate in a future article! Until then, this is a MicroPython library that lets you play with HID directly, on the lowest level comfortable. In the next article, I want to give you a Linux-compatible toolkit for playing with both device descriptors and HID packets, showing you how to quickly and easily debug all sides of the equation, and then, I’ll show you how to modify the descriptor to create your own USB touchscreen!
from Blog – Hackaday https://ift.tt/I2L3qf6


Comments
Post a Comment