Scope GUI Made Easier
Last time, I assembled a Python object representing a Rigol oscilloscope. Manipulating the object communicates with the scope over the network. But my original goal was to build a little GUI window to sit next to the scope’s web interface. Had I stuck with C++ or even C, I would probably have just defaulted to Qt or maybe FLTK. I’ve used WxWidgets, too, and other than how many “extra” things you want, these are all easy enough to use. However, I had written the code in Python, so I had to make a choice.
Granted, many of these toolkits have Python bindings — PyQt, PySide, and wxPython come to mind. However, the defacto GUI framework for Python is Tkinter, a wrapper around Tk that is relatively simple to use. So, I elected to go with that. I did consider PySimpleGUI, which is, as the name implies, simple. It is attractive because it wraps tkinter, Qt, WxPython, or Remi (another toolkit), so you don’t have to pick one immediately. However, I decided to stay conservative and stuck with Tkinter. PySimpleGUI does have a very sophisticated GUI designer, though.
About Tkinter
The Tkinter toolkit lets you create widgets (like buttons, for example) and give them a parent, such as a window or a frame. There is a top-level window that you’ll probably start with. Once you create a widget, you make it appear in the parent widget using one of three layout methods:
- Absolute or relative coordinates in the container
- “Pack” to the top, bottom, left, or right of the container
- Row and column coordinates, treating the container like a grid
The main window is available from the Tk() method:
import tkinter as tk
root=tk.Tk()
root.title('Example Program')
button=tkButton(root, text="Goodbye!", command=root.destroy)
button.pack(side='left')
root.mainloop()
That’s about the simplest example. Make a button and close the program when you push it. The mainloop call handles the event loop common in GUI programs.
Newer Widgets
Some tkinter widgets look old-fashioned, but newer variants can automatically replace the old ones. The new widgets are packaged as tkinter.ttk. These new widgets have slight differences, but most of the basic setup remains the same. The appearance functions are different, though. For example, a normal button uses fg and bg to set the foreground and background colors. A ttk button uses a style system that is more complex to set up, but also more powerful.
It is dead simple to use the new widgets. Normally, you’d import the whole GUI library with an import. You can import ttk from the tkinter module and then refer to the widgets explicitly (e.g., ttk.Button). However, it is common to simply import everything from tkinter and then use tkinter.ttk to override anything that is in the ttk library. For example:
from tkinter import *
from tkinter.ttk import *
Now, every reference to Button, for example, will resolve to ttk.Button. There are 18 “new” widgets, including some that don’t appear in the original tkinter, like Combobox and Treeview.
GUI Builder?
I started out looking for a good GUI builder for tkinter and I didn’t really find much. There’s a website that doesn’t seem to work well (and doesn’t handle ttk), a project that uses a paid GUI builder and then translates its output to tkinter, and PAGE.
PAGE is actually not bad but a little quirky. What I didn’t like was that it does the ordinary placement layout, which means a form you design might look bad on some machines due to font sizes or other factors. So a button might be placed at, say, 0.034 x 0.267 from the top corner of its container. In other words, 3.4% across and 26.7% down. However, if you spend some time with it, it does work and probably generates code that looks ok more than it fails to render nicely.
However, I finally decided just to build the GUI manually. It isn’t that hard. If you want a simple experience, check out PySimpleGUI I mentioned earlier. The layout there is a list of lists. Each list is a row in the GUI. That’s it. So: [ [ Row_1_column_1, Row_1, column_2,...],[Row_2_column_1,....],...]. That’s very simple to deal with. But doing it directly in tkinter is not bad, either.
Layout
I used a simple class to lay out my GUI and tried to keep it agnostic to the scope more or less. It creates a Scope object (from the last post) and manipulates it, but it doesn’t understand the commands or the communications. If you are a traditional GUI programmer, the scope object is the model and the GUI class is the view and the controller.
Most of the work occurs in the class constructor. There are three main parts:
- Some internal state variables like
connectedand thescopeobject, which, initially isNone. - The creation of GUI widgets. This doesn’t show anything; it simply creates the objects. This section also creates some ttk styles for use with the Run/Stop button.
- The final section arranges the widgets in their parents.
You have to get used to the idea that you specify the parent widget in step 2, but you set the widget’s position in step 3. For example, consider this excerpt from the code:
   self.clabel=LabelFrame(self.top,text='Control')
   self.rsbtn=Button(self.clabel,text="Run/Stop",command=self.do_rs,style="GoBtn.TButton")
   . . . # create more stuff
   self.rsbtn.pack(side="left")
   . . .  # more buttons here
   self.clabel.pack(side='top',fill='both',expand='yes')
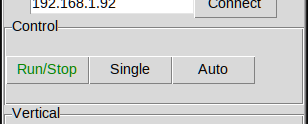
The first line creates a labeled frame attached to the top window. Then, the code makes a button that is a child of the label. It has some text, a style, and a function to call when you push the button.
pack layout manager. However, I also use the grid manager in a custom component. A tiny bit of code at the end of the constructor captures the Enter key so you can type in an IP address and hit Enter instead of pressing the connect button. The code also sets the focus on the entry field. If you are a keyboard aficionado, the tab order, by default, is the order you create the widgets, although you can change that in the software.Custom Components
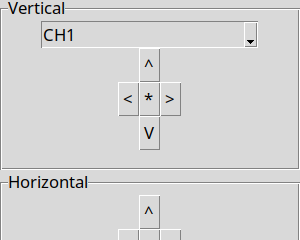
For the scope controller, I needed some direction pads. That is, four arrow buttons going in different directions and a center button you can push. The tkinter library has nothing like that, but that’s not a problem. You can simply build it yourself. The tkinter widgets are just classes, and you can easily extend them to make your own variations and composite widgets.
First, I needed a small button, and out of laziness, I decided to create a custom component. I simply derived a new class from Button and set a default width of 1 in the constructor. Truthfully, I should have just hardcoded the width. If you are going to supply a width, why not just use a regular button? Anyway, here’s the entire code:
# Create a tiny button
from tkinter import *
from tkinter.ttk import *

class Button1(Button):
def __init__(self, parent,text='',command=None,width=1):
   Button.__init__(self,parent,text=text,command=command,width=width)
As you can see, creating a custom widget doesn’t have to be a big deal. Normally a good base class for custom widgets is Frame. A frame can hold other widgets; by default, it is invisible. Just what you need. In this case, though, it made more sense to customize the Button class.
I did use Frame as the base class for the direction pad. I create some buttons that use a lambda — an anonymous, inline function — for their actions. This lets the code easily call a single callback for all the buttons. The default callback breaks everything back out to functions like up or down.
At first, that might seem crazy. Why not just assign the function directly to the key? The answer is reusability. There are several ways to use the custom component:
- Set a non-default callback. This is a single function to process all keys.
- Create a new subclass and replace the default callback. Again, this is a single function for all keys.
- Create a new subclass and replace each of the low-level functions. This provides separate functions for each key.
The layout is simple, using the grid call to set a row and column:
 def __init__(self,parent,callback=None):
   Frame.__init__(self,parent)
   self.callback=callback
   self.upbtn=Button1(self,text="^",command=lambda: self.press(Dpad.UP))
   self.dnbtn=Button1(self,text="V",command=lambda: self.press(Dpad.DOWN))
   self.rtbtn=Button1(self,text=">",command=lambda: self.press(Dpad.RIGHT))
   self.lfbtn=Button1(self,text="<",command=lambda: self.press(Dpad.LEFT))
   self.exebtn=Button1(self,text="*",command=lambda: self.press(Dpad.EXEC))
   self.upbtn.grid(row=0, column=1)
   self.lfbtn.grid(row=1, column=0)
   self.rtbtn.grid(row=1, column=2)
   self.dnbtn.grid(row=2,column=1)
   self.exebtn.grid(row=1,column=1)
Now, the main code can create two different direction pads without problems.
The Whole Enchilada
You can find the entire code on GitHub. Once you get past the GUI layout, most of the code just calls the object from the last time that actually talks to the scope.
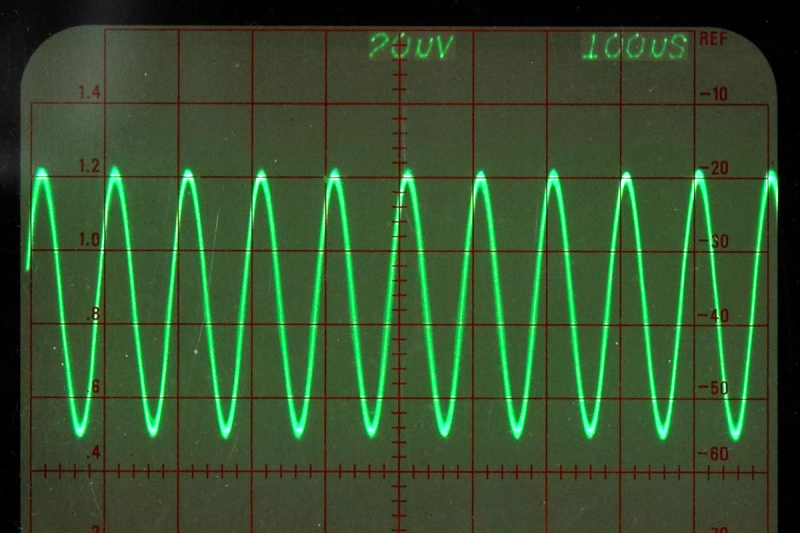
There are two interesting things, though. Since the DHO900 doesn’t give you a way to emulate key presses, the program has to understand a bit about the state of the device. For example, pressing the Run/Stop button works differently if the scope is already running or already stopped. So, the program needs to know the current state to send the right command.
It is possible to query the scope at the time of the command, of course. However, I wanted the program to track the state periodically and update certain UI elements. For example, I wanted the Run/Stop button to show red or green based on what would happen if you pressed the button. The trigger type combo box, too, should reflect the current trigger state even if someone manually changes it.
Luckily, tkinter provides a way to add delay processing to the event loop using after. The code calls it against the top window with a delay in milliseconds. When the timeout expires, the tick function runs. To keep the timer function going, tick must also rearm itself by calling after again. Before that, though, the code queries the state of the scope and updates the UI along with some state variables in the UI object.
The program seems to work well and should be much easier to port to a different scope now. If you can’t tell, GUIs are generally not my thing, although I build them when I have to. For simple stuff, tkinter isn’t half bad.
Once you can control your scope and grab data from it, there are lots of fun things you can do. Things can quickly get out of hand — but in a good way.
from Blog – Hackaday https://ift.tt/wAVitcK


Comments
Post a Comment